Overall Build and Deployment
Repo: Banno/docs.banno.com
As part of our documentation efforts, we also maintain and monitor the Wiki and Knowledge Base sites. Knowing how these sites build and deploy helps us ensure sites are successfully updated. With Hugo as our doc site generator, Banno uses Jenkins to build and deploy our websites. Jenkins accesses a virtual machine or database to run all of the commands. That machine is where all our files are hosted and collected, and then used to generate our websites. These websites include:
- Wiki
- Knowledge Base
- Internal-facing for authenticated users: https://docs.banno.com/knowledge/
- Customer-facing: https://knowledge.banno.com/
- Note the difference between URLs
- Internal-facing for authenticated users: https://docs.banno.com/knowledge/
- Consumer API Docs
- Platform API Docs
- Digital IS API Docs
- Internal API Docs
- Roadmap
The Jenkinsfile is the most important file in the docs.banno.com repo. Details to know about this file include:
- Gives Jenkins the commands to run and build each stage of the deployment process. If the site generator or something with Github changes, we make updates within the file.
- Contains flags (ex. -D) for building draft sites.
- Contains site links and where to host sites.
Monitor
When monitoring deployment, the docs.banno.com Github repo manages the Jenkins job details page. For deployment details and failures, stage view, and build history, this is the go-to page. Helpful links in the sidebar nav on the Jenkins page include: * Status - view the overall stage view for all sites * Changes - view individual build histories, commits, commit messages, and who committed the merge. * Build Now - manually kick off a deployment without merging a PR * Build History - view deployment history and details including the build number, date, and time. When selecting an individual build, you can see the commit history.
Note: Prior to building site stages, Declarative: Checkout SCM checks for updates (what changed in Github). When the site stages successfully build, Deployment copies all of the old files up to the new files and is the last stage in the deployment process.
With the Jenkins job details page tracking site builds, you can see how long it takes for each site to build and if it succeeded or failed. Site stages highlighted green indicate a successful build, while site stages highlighted red indicate a failed build.
Jenkins failed. Now what?
Occasionally, Jenkins fails to rebuild and deploy our sites.If one site stage build fails, all subsequent site stage builds fail and deployment overall fails. When this occurs, we’re notified in #team-docs with a Declarative: Post Actions message (ex. docs.banno.com #7497 Build Unsuccessful). When this happens, select the link in the message and check the following:
- Kick off a manual build by selecting Build Now. See if the failure repeats itself.
- There could be a server or network error.
- Jenkins status webpage
- Possibly an overall Jenkins issue.
- Github status webpage
- Possibly an overall Github issue.
- You can tell which site kicked off the failing process when it’s highlighted red. Check the failed build log.
- Hover over the first failed site stage, and click Logs. An error log displays. If it’s an error with the Wiki or Knowledge Base, you’ll need to resolve it. If it’s an error with another site, reach out to the engineer and let them know of the failed build. Make sure to provide the error message.
- In the sidebar navigation, you can also select the failed build under Build History. Read through details on that page, as well as the build’s Console Output page (hint: try control+F “error” or “Error building site” as it might point you to the cause). See what information it offers and who’s responsible for the merge. If needed, reach out to that colleague and let them know.
- If you’re unsure what caused the failure, ping Wes.
- If Wes is unavailable, ping #org-infrastructure for assistance and include a link to the most recent failed build.
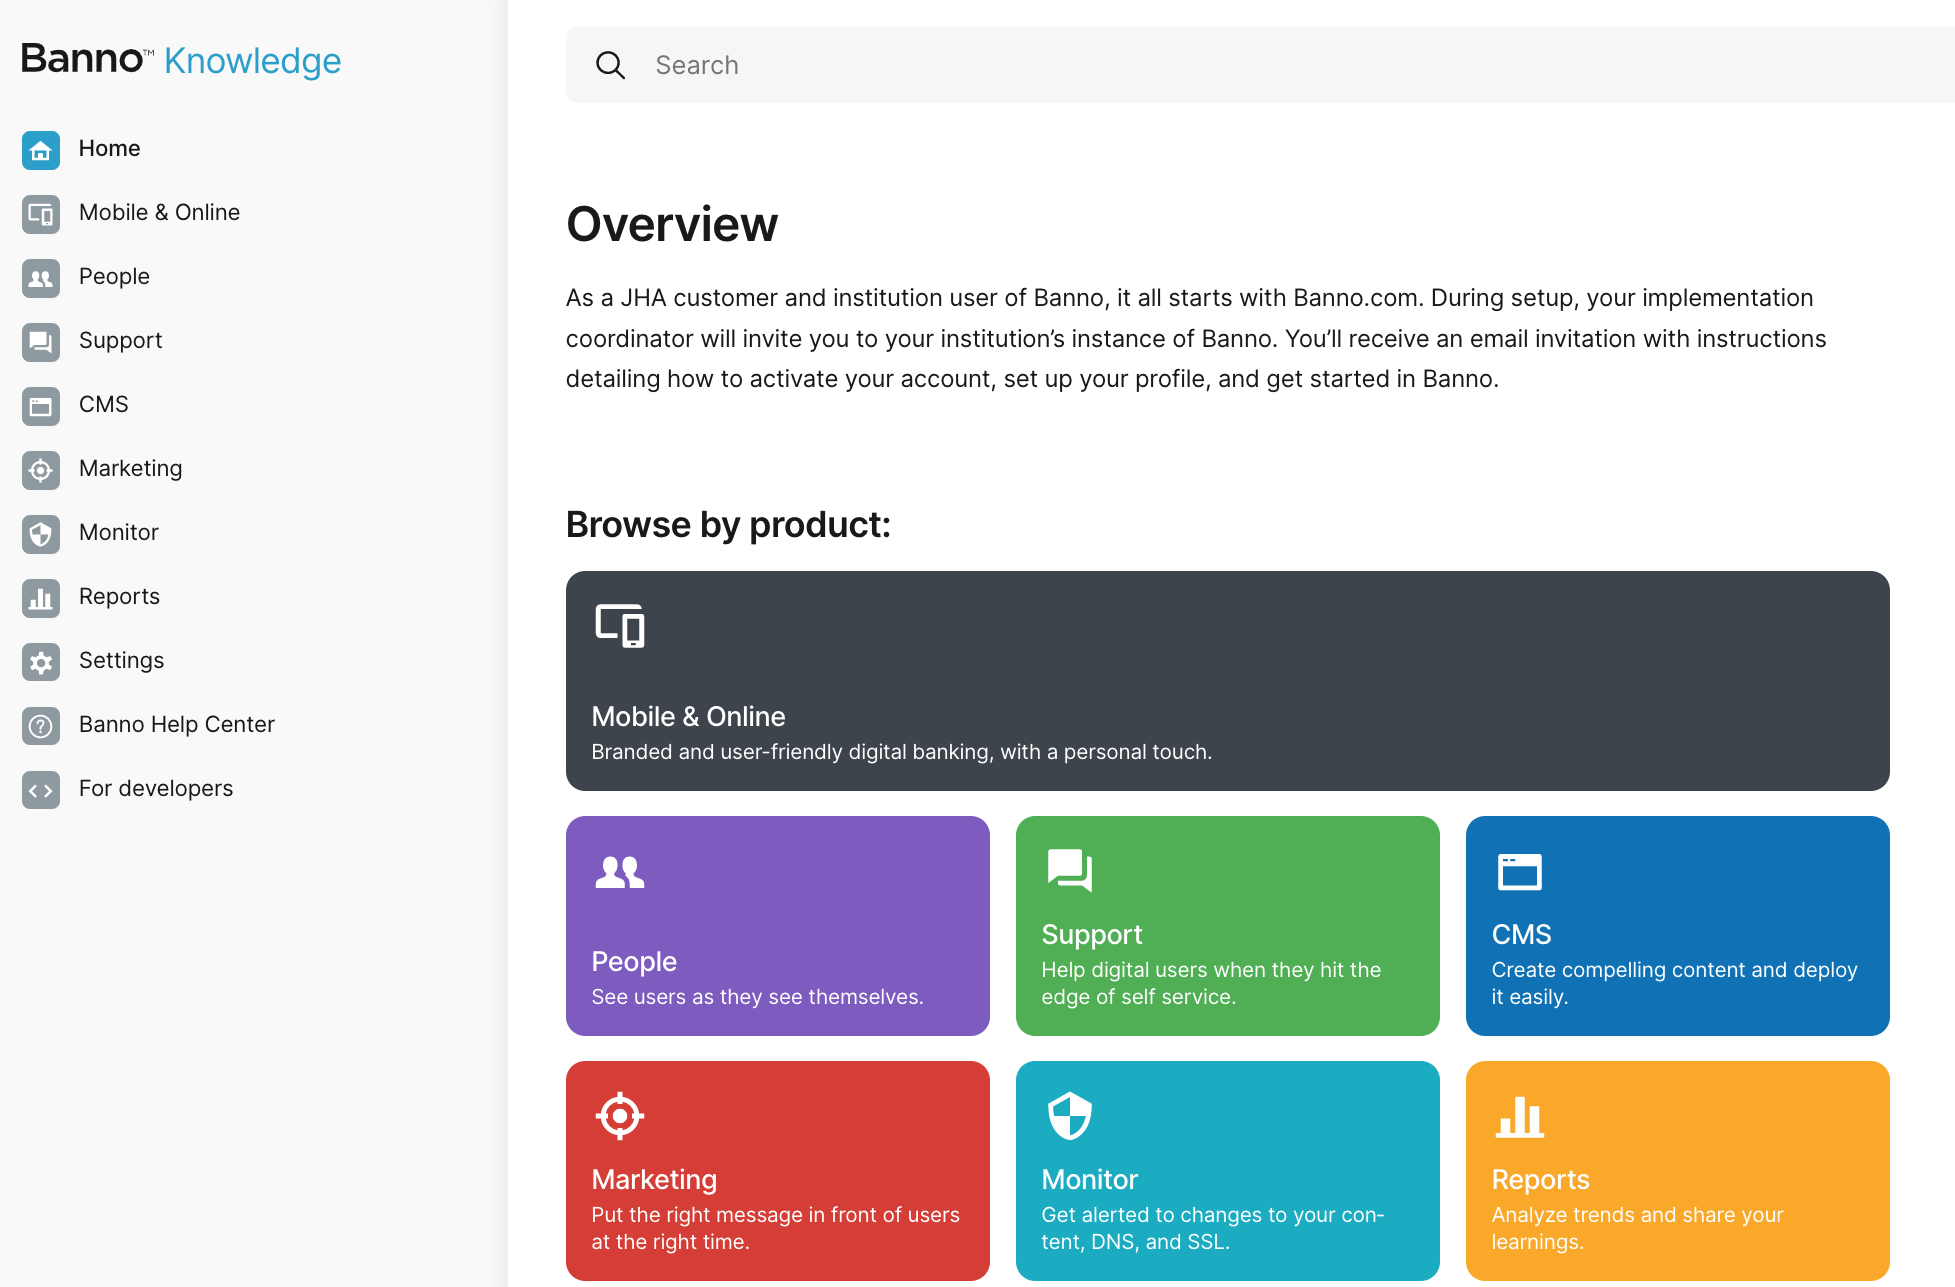
Knowledge Base
Repo: Banno/knowledge
When it comes to the Knowledge Base, we use the site generator Hugo to build and deploy two sites: an internal site as well as a customer-facing site. They’re essentially the same, except docs marked as draft: true display in the internal site only. The internal site also has a couple page features specific to the site, including a pencil icon to directly edit the page and a copy link icon to copy the page’s customer-facing URL.
Hugo accepts different file types, and we use .toml files to give us the information at the time of building the site. Main files to know about in the Knowledge repo include the config.toml and netlify.toml files. Let’s dig into them.
config.toml file
The config.toml file tells the entire Knowledge Base site how to build and contains variables that can be pulled from anywhere on the site.
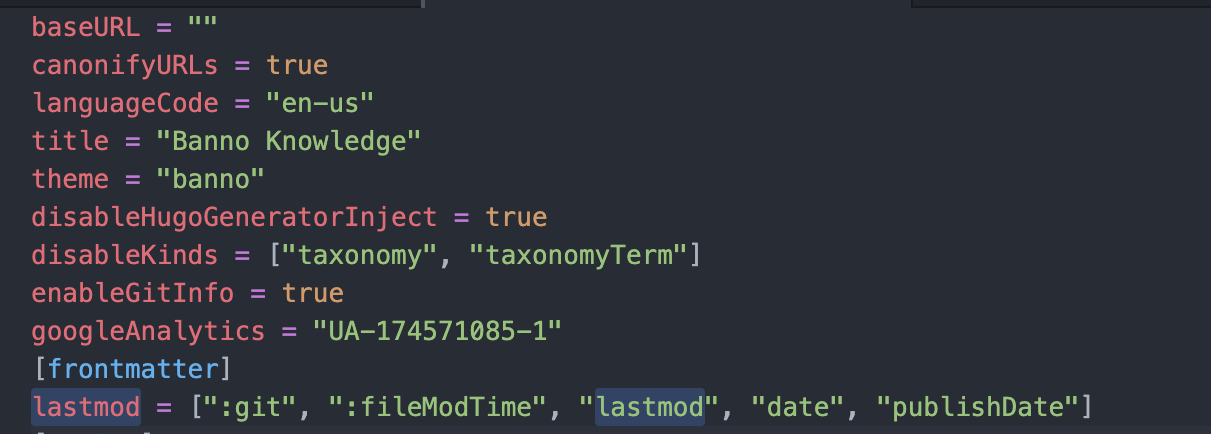 These first bits of build options have to do with how Hugo works behind the scenes.
Important things to note include:
baseURL = "": Gets replaced at build time with docs.banno.com/knowledge or knowledge.banno.com. We can set the URL outside of this file and have it blank so that it exists.disableHugoGeneratorInject = true: Makes it so that we’re not rendering Hugo shortcodes in certain situations.disableKinds = ["taxonomy", "taxonomyTerm"]: helps build our indexing so that searching is more efficient.enableGitInfo = true: Used for our build process. It also allows us to make alastmod.googleAnalytics = "UA-174571085-1": Using our Google Analytics ID, allows the site usage to be tracked.lastmod = [":git", ":fileModTime", "lastmod", "date", "publishDate"]: Tracks the most recent date the repo was updated. On the Knowledge Base, this is used as part of displaying the Recently added documentation and Recent operations guides sections on the homepage.
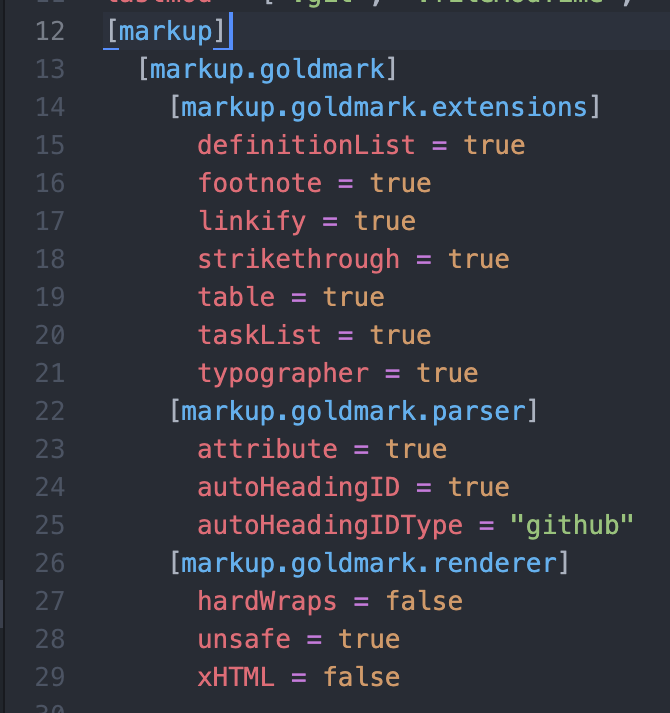
markup tells us how our Markdown generator works. It enables definition lists and footnotes, as well as allows us to generate html and json directly within the Markdown file.
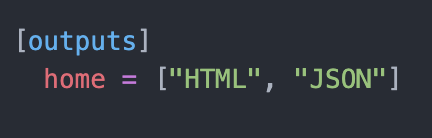
*outputs Hugo can output in these file types when we tell it to build.

params determines our For Clients default link and dispays in the header and footer of a page. If we don’t have a For Clients link, the short code works but grabs the home page from mobile.
The rest of the config.toml file is used to dynamically build out the menu on the homepage.
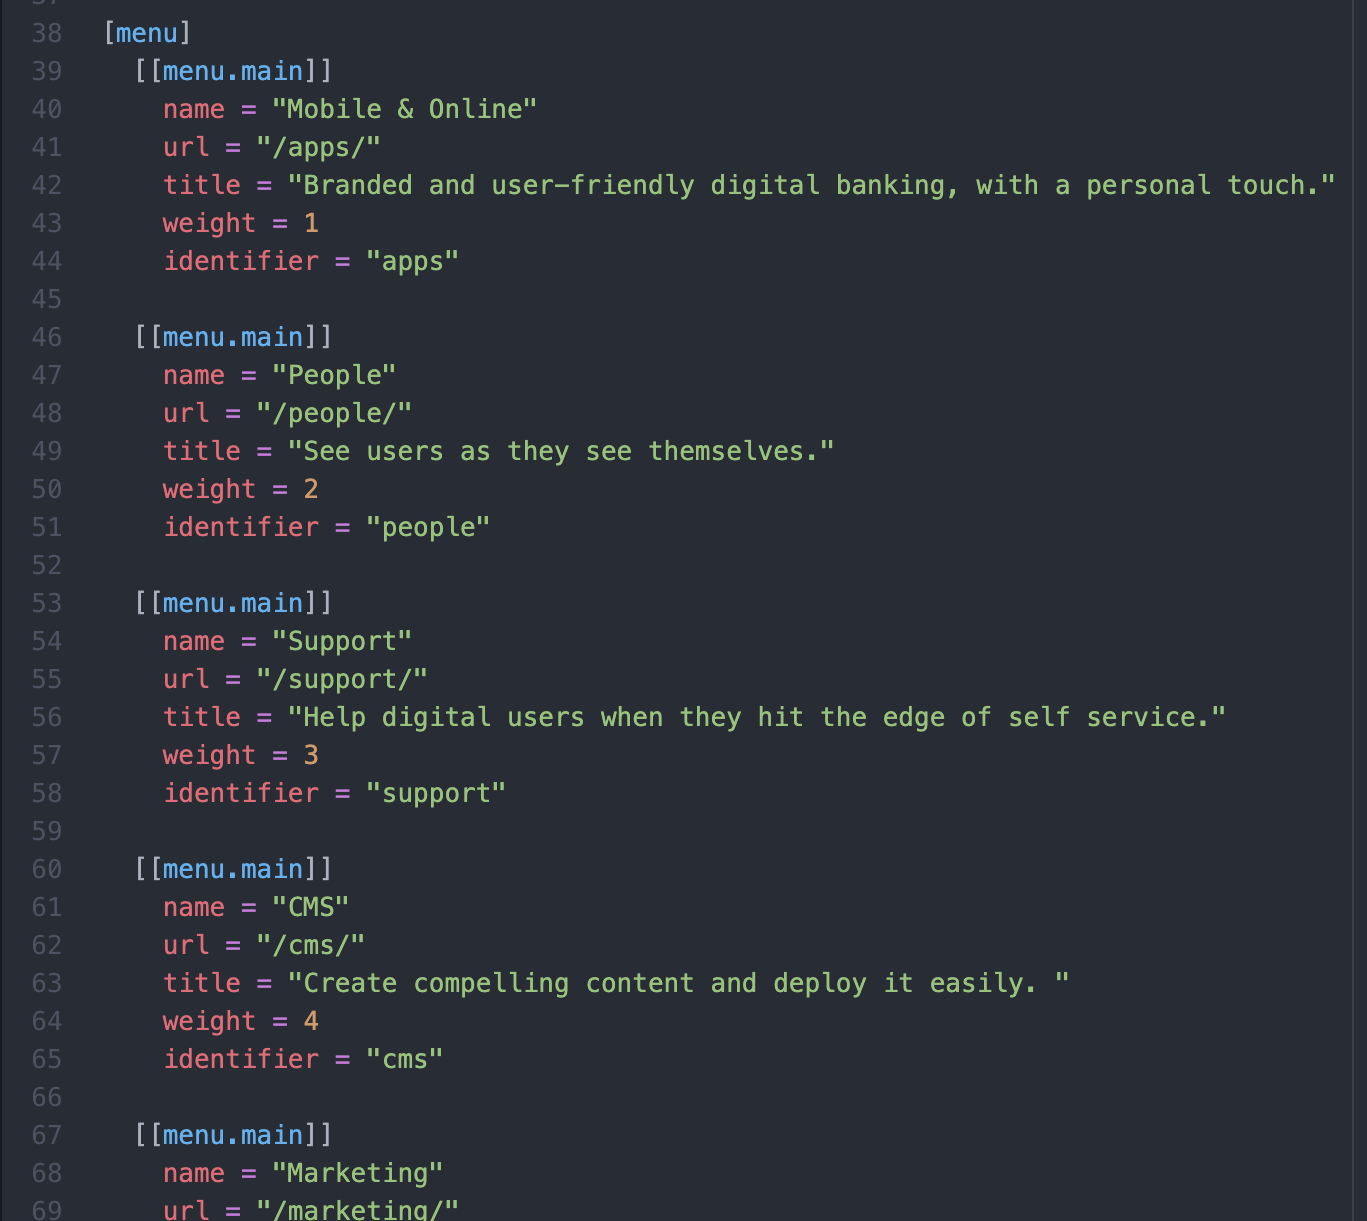
Add or update an individual card name, URL, title, reorganize order (weight), and add the identifier.
Jenkinsfile
The Jenkinsfile’s job kicks off build master when a commit happens to master.
netlify.toml file
The netlify.toml file contains information about the customer-facing site (https://knowledge.banno.com/) and used in how we publish that site. If we didn’t have this file, we’d only have the internal site. Also, this file does a lot of the same stuff as Hugo but faster. The file uses some fields from the config.toml file to determine which Knowledge Base site (internal or customer-facing) to deploy content to. When previewing the site, use the following commands in the terminal:
- Preview the internal Knowledge Base:
hugo server -D - Preview the customer-facing Knowledge Base:
hugo server -b
CODEOWNERS file
Github looks for this file and team names (or a list of users) anytime a PR is open in the repo, and it automatically tags them as reviewers. This eliminates the need for PR owners to remember tagging doc team members.
static folder
The static folder contains icons used in the browser, basic javascript, outlines for a few different icons used across the site but not the shortcode.
themes folder
Themes is where most of the backend work is done.
theme.toml file
This file displays metadata such as the minimum version and individual who created the site. This file isn’t necessary, but it’s good practice to have it.
assets folder
This folder contains our javascript and scss used for our pages. This folder handles code execution verses building and deploying our static websites.
js folder
Javascript enables our site to be responsive, display a site search, buttons that expand content, complex two-column list functionality, visibility toggles that expand content, etc. It modifies the content of our page in some way, shape, or form.
sass folder
scss controls how color, style, and size display on websites. The following files each serve a purpose for the site and pages:
- main.scss: Contains the building block of color and text for the Knowledge Base, including css for dark mode. It also supports variable fonts and controls how text displays, including padding and scrolling. If text displays “off,” take a look at this file. This is the default file.
- button.scss: Used to expand content using responsive design.
- card.scss: Used for displaying the homepage navigation and rendering video cards.
- content.scss: This file differs from main.scss file and used for article wrappers around a doc page, index pages, dictates how media displays based on page width, margins around lists and tables, background tag colors, etc. This file also handles styles relating to short codes, as well as responsive design.
- font.scss: Formats fonts across the site.
- footer.scss: Formats the bottom template of a page.
- header.scss: Displays the search functionality, search bar, Support button, Sign-in button, etc. at the top of a page.
- search.scss: Formats and manages the search bar functionality at the top of the site.
- sidebar.scss: Formats the left-hand sidebar on the homepage.
These files are the default for how things display but can be overridden. When changing or adding a color, ask a designer to review color selection.
layouts folder
The layouts folder is the html itself. While Hugo generates HTML, we put wrappers around HTML and call for Hugo to generate it.
_default folder
Within the _default folder:
- index.html: Handles homepage cards and features such as the sub-cards below the section cards, Recently added documentation, and Recent operation guides.
- _default folder
- baseof.html: Controls where to put the head (top part of the site), header (metadata), navigation, on any given page.
- index.json: Handles our search index. When we search, it searches every page on the Knowledge Base.
- list.html: Controls list articles. Hugo supports this, but we don’t currently use it.
- section.html: Handles section articles, such as navigating back the section from a page—it’s how Hugo organizes sections and _index files.
- single.html: Handles an individual page and its logic linking back to the section.
partial folder
A partial is an incomplete html file, but it doesn’t put in tags to be a viable webpage. They’re used for building blocks (like short codes) as part of html files in the _default folder. We built these individually so we can easily change components and plug them in as needed. Within the partials folder:
- footer.html: Renders text at the bottom of a page on the site.
- head.html: Renders the icon that displays in the browser tab.
- header.html: Handles the top of the website, including navigation, search, login, internal doc drop-down notice, etc.
- help-link.html: Renders the help link and its text when using the short code.
- icon.html: Renders the svg icons for navigation on the homepage and sidebar navigation.
- nav.html: Renders the left-hand navigation on the website.
- ops-doc-header.html: Renders the pm and status in an ops doc.
- page-actions.html: Logic to display and use the pencil icon to directly edit docs and the link icon to copy a page’s URL.
- page-list-item.html: Logic to display and click an individual page link under a section. Displays on the left-hand navigation on the homepage.
- page-sidebar.html: Renders the table of contents navigation displaying on the right-hand side of a page.
- related-link.html: We don’t currently utilize.
- scripts.html: This loads all the scripts we use by file.
shortcodes folder
Documentation for short codes is on the Knowledge Base.
Github
Working in-conjunction with Hugo, we’ve set up some functionality with checks and balances in Github. These checks ensure a page displays and works once live. Github doesn’t catch everything, but each checks monitors specific things on the site after it’s generated:
Checks to make sure we’re following the rules of the internet.
- Header rules: Checks that we haven’t changed anything that wouldn’t be valid in a browser.
- Pages changed: Checks for updated/changed pages.
- Redirect rules: Checks for if you click on something it redirects.
- Mixed content: Checks to make sure all internal links are https (secure links) and not http.
- continuous-integration/jenkins/pr-merge: Makes sure the PR works.
- netlify: Using the netlify.toml file, gives a deploy preview link and builds without
draftflags (used to classify internal docs). It’s a temporary site link, and for security purposes, we don’t include building the site with internal docs. As a result, this check only displays when updating or adding customer-facing pages. Note: The link can be shared with others. The link may or may not keep up with commits, so be aware that if sharing links and then making more commits, you might need to share the newest link. The way things display in the preview site will display the same on the customer-facing site. It’s a good practice to review the site prior to merging.
If a check breaks, reach out to Wes.
If there’s a build difference between the locally-run vs preview version, check the netlify.toml file:
[context.production.environment]
HUGO_VERSION = "0.66.0"
HUGO_ENV = "production"
HUGO_ENABLEGITINFO = "true"
This sets the version of Hugo we use to build the site. Depending on the local version (run hugo version on your command line) and HUGO_VERSION, there could be enough changes affecting how the site builds. To resolve the difference, some web dev is needed to update the version and needs to be done by Wes or another engineer.
Block Merging a PR
Marking a PR as Draft or not having an approval by a reviewer blocks the PR from being able to merge.
Admin Rights
Team members with owner (admin) rights are able to merge PRs without an approval. To see who has owner rights:
- Go to Banno
- Click the People tab
- Click Role
- Select Owner
Managers and specific teams that manage Github generally have owner rights.
FAQ
- Who can access internal sites?
- Anyone with a JHA or Banno email can access the internal Knowledge Base and API. Outside stakeholders can also be manually added to access the sites.
- Who can access internal sites?
- Anyone with a JHA or Banno email can access the internal Knowledge Base and API. Outside stakeholders can also be manually added to access the sites.
FAQ DOES NOT DISPLAY
Who can access internal sites?
Anyone with a JHA or Banno email can access the internal Knowledge Base and API. Outside stakeholders can also be manually added to access the sites.
How are outside stakeholders given credential access to the internal Knowledge Base site?
To give non-JHA employees access:
- Go to the Knowledge repo
- In the Jenkinsfile, select the server.js file
- Locate the
// Email addresses should be entered lowercasesection - Add the individual’s email address, name, and company. Note who requested they be added
- ’email address’, // individual’s name, company - added per [individual’s first and last name]
These days, the doc team typically doesn’t add outside stakeholders. The Developer Advocate team works with partners and will sometimes add individuals for them to access the API.
Which teams are responsible for which sites?
- Wiki - Documentation team
- Knowledge Base - Documentation team
- Consumer API Docs - Developer Advocate team
- Platform API Docs - Developer Advocate team
- Digital IS API Docs - Developer Advocate team
- Internal API Docs - Developer Advocate team
- Roadmap - Todd Munik
How does the Slack/Jenkins integration work to notify the doc team?
There is a Jenkins app integrated with Slack. Also, in the Jenkinsfile, it tells Jenkins what to do. If adding a team, changing the team, etc. is needed, you’ll make changes in the file.